How to Stream from OBS to WordPress over WHIP
OBS Studio is where most streams are made: scenes, overlays, a second camera, a slide deck beside your face. Since version 30, OBS can also send its stream over WHIP, the standard way to push a stream into a WebRTC service. That makes a new route possible: from OBS straight to a page of your WordPress site, watched in the browser with low delay, with no RTMP server in between.
This guide sets it up with Live Stream, step by step, with the OBS settings that decide how soon viewers see the picture and how smoothly it plays.
What WHIP is, and why it matters
For years, encoders sent streams over RTMP. RTMP takes the stream to a server, which repackages it for viewers, usually as HLS: short files of a few seconds each, which players download one after another. It works at any scale, and it puts viewers several seconds behind the host.
WHIP, the WebRTC-HTTP Ingestion Protocol, sends the stream over WebRTC instead, the technology browsers use for video calls. It is an IETF standard (RFC 9725). The encoder asks a WHIP server address, with a bearer token, to take its stream, and from then on the picture flows as WebRTC packets. A WebRTC service can pass those packets on to viewers as they arrive, so they see the host with low delay, close enough to react in the chat while the moment is still on screen. More on why: Low latency live streaming: why WebRTC.
OBS has had WHIP since version 30. FFmpeg has a WHIP output as well, from version 8.
What you need
- OBS 30 or later. For layers (below), OBS 32.1 or later.
- A WordPress site with Live Stream and a WordPlus Cloud subscription that includes live streaming (How to live stream on a WordPress site covers installing it).
- A stream in Live Stream → Studio → Streams, on a page of your site.
Connect OBS, step by step
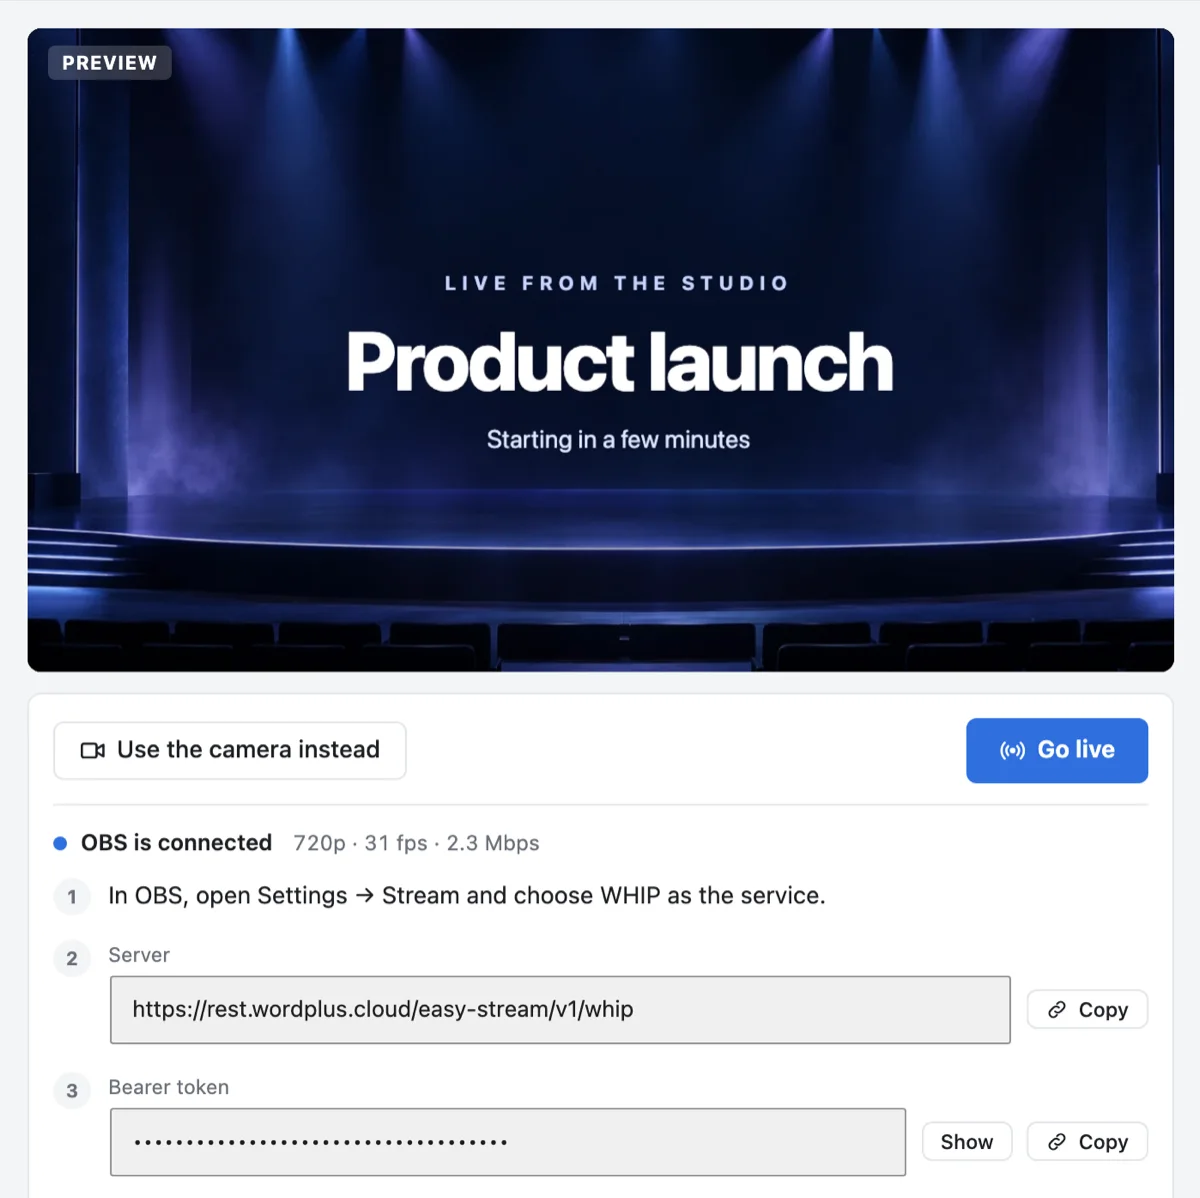
- Open the studio of the stream. In Live Stream → Studio, choose Go live beside the stream, then Stream from OBS. With the camera already on, it is under More. The studio shows the steps, with "Waiting for OBS…".
- In OBS, open Settings → Stream and choose WHIP as the service.
- Copy Server from the studio into the Server field of OBS.
- Copy Bearer token from the studio into the Bearer Token field of OBS.
- Set Total Layers to 3, in the same window, if your OBS has it (32.1 or newer).
- Set the output of OBS as below, then press Start Streaming in OBS.
- Check the picture. Once it arrives, the studio says OBS is connected and previews it with its size, frame rate and bitrate. Only you see it so far.
- Press Go live in the studio. Viewers see the whole picture from OBS.
The token is the key of the stream. Only its hosts see it, and New key in the studio makes a new one if it was seen by someone it should not have been.
The OBS settings that matter
Layers: one picture in three sizes
With Total Layers at 3, OBS sends the full picture and two smaller copies of it at once. Each viewer gets the largest their screen and connection take, and a viewer whose connection slows down steps down to a smaller copy instead of stopping to wait.
Layers cost upload. OBS gives the full picture the bitrate you set and the copies two thirds and one third of it, so 4,500 kbps takes about 9 Mbit/s of upload in all. If your upload cannot carry that, set a lower bitrate, or 2 layers.
Without layers, every viewer gets the same picture, so choose a size that every connection can take.
Size and bitrate
- Settings → Video: Output (Scaled) Resolution 1920×1080 at 30 FPS with layers. Without layers, 1280×720 lets viewers on slow connections keep up.
- Settings → Output: choose the Advanced output mode, and under Streaming set the bitrate to about 4,500 kbps with layers, or 2,500 kbps without.
These are a starting point. What suits a stream depends on what it shows, on the computer that sends it and on its connection.
Keyframes and B-frames
Two settings decide how soon viewers see the picture and how smoothly it plays, and only the Advanced output mode of OBS has them (Settings → Output → Output Mode, then the Streaming tab):
- Keyframe Interval: 1 s. A viewer sees the picture from the next keyframe on, when they arrive and when they come back to the page from another tab. The Simple output mode leaves the interval on auto, about one keyframe every 8 seconds, so viewers can wait that long. At 1 s, they wait a second at most.
- Max B-frames: 0. Browsers skip B-frames, so a picture with them stutters. Some encoders start this setting at 2 in the Advanced mode.
Keep the Video Encoder the Simple mode had, a hardware encoder of your graphics card where there is one, and leave the rest as it is.
The studio checks both while OBS sends, and says what to change, without stopping you from going live.
Try it before your audience does
- Make a stream for trying, on a page nobody else knows, start streaming in OBS and press Go live.
- Open its page on another device, on another network if you can, and watch for a few minutes, with the kind of picture you will stream.
- Keep View → Stats open in OBS: it shows frames skipped by the encoder and frames dropped on the way out.
Then change one thing at a time:
| What you see | What it means | What to do |
|---|---|---|
| The picture freezes and catches up | Your upload cannot carry what OBS sends | Lower the bitrate, or 2 layers |
| It stutters, and Stats shows frames skipped due to encoding lag | The encoder cannot keep up | A faster preset, or fewer layers |
| Detail pulses once a second on a busy picture | Each keyframe takes a large share of the bits | A higher bitrate, or a 2 s keyframe interval |
| Viewers wait seconds for the picture | Keyframes too far apart | Keyframe Interval 1 s |
| Everything plays smoothly | Keep it, or try a higher bitrate |
A stream that runs by itself
For a stream sent from a computer that is always on, such as a demo or a camera on a view, turn on Go live when OBS connects in the settings of the stream. It then goes live as soon as OBS starts streaming with its token, with nobody in the studio, and stays live for as long as OBS sends. If OBS stops, the stream stays live while anyone watches, ends after five minutes with nobody watching, and goes live again as soon as OBS is back.
When OBS does not connect
- The studio stays on "Waiting for OBS…": check that the service in OBS is WHIP, and that the server and the token were copied whole.
- OBS says it could not access the stream key: OBS says this whatever the server answered. Check that the token is the one the studio shows now.
- OBS cannot connect after the stream ended: an ended stream keeps OBS out. Choose Stream from OBS in its studio again, then start streaming in OBS.
The full reference is in the docs: Streaming from OBS.
Frequently asked questions
Can I stream to WordPress from OBS over RTMP?
Not with Live Stream yet. It takes OBS and other encoders over WHIP. Streaming in over RTMP is planned.
Do I need OBS to go live?
No. Live Stream also goes live from the browser, with a camera, a microphone and a shared screen. OBS is for scenes, overlays and several cameras.
What quality reaches viewers?
Up to the picture OBS sends, and no more than 1080p. If OBS sends a bigger picture than the stream takes, the studio says so and waits until it is changed. Each viewer gets the largest layer that their player and connection need.